

Have a song you love but can’t find a karaoke version with lyrics that follow the singing properly? This guide shows you how to make your own karaoke video on a computer (Windows or Mac) with Kara Studio, from adding the music and lyrics to exporting a video file you can upload to YouTube, play on a TV or use in a karaoke venue. Every step comes with a real screenshot of the app in English.
What you need
Kara Studio can build a karaoke video in two ways, depending on what you have:
- Option 1, with a video (music video, live clip): video + instrumental (beat) + lyrics. A video usually already contains the original vocals, so you use the video’s own sound to listen and mark each word.
- Option 2, with a still image: image + a song with vocals + instrumental (beat) + lyrics. The song with vocals is only for listening and marking, and the image becomes the background.
In short: the version with vocals (the video’s sound, or the vocal song file) is only there for you to listen to while marking words. The instrumental (beat) is what viewers will actually hear in the final karaoke video. So before exporting, always mute the version with vocals.
1Choose the app language
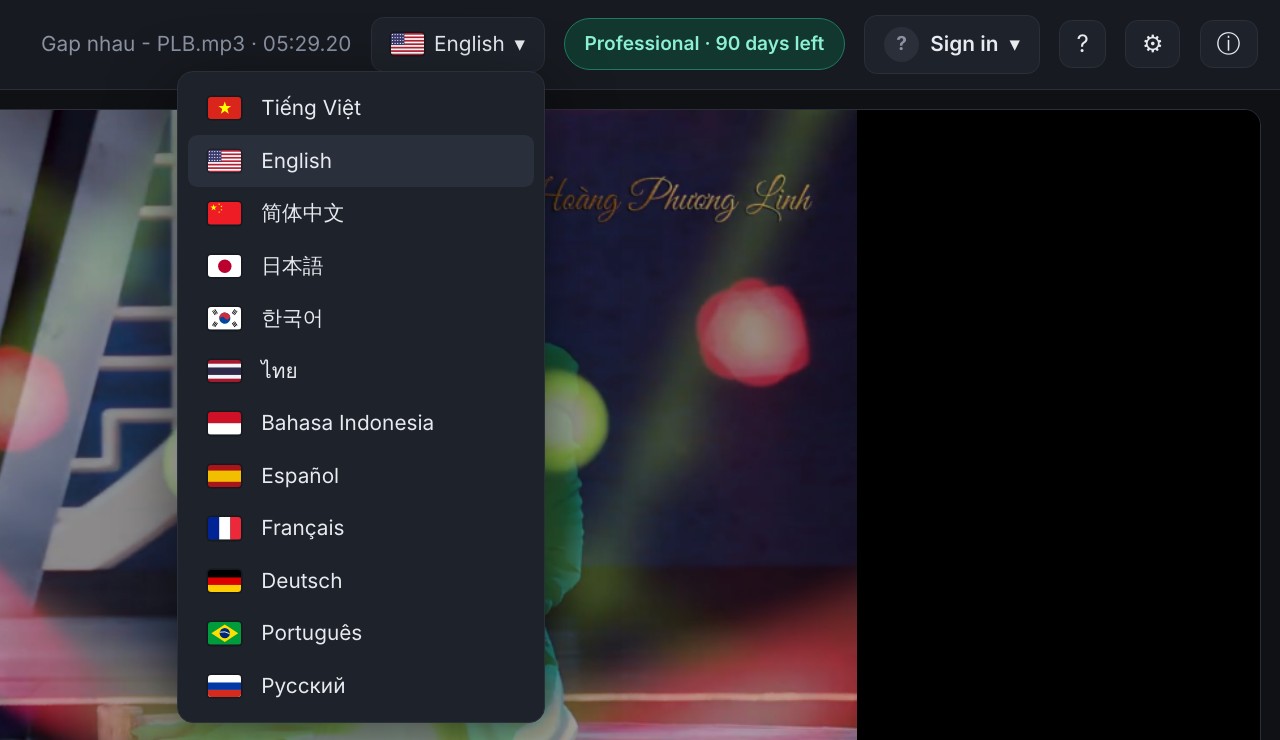
Kara Studio comes in 12 languages: Tiếng Việt, English, 简体中文, 日本語, 한국어, ไทย, Bahasa Indonesia, Español, Français, Deutsch, Português and Русский. The first time you open the app you pick a language on the very first screen. To change it later, click the language button at the top right of the top bar (it shows a flag and the current language name), then click the language you want. The app reloads and keeps the project you are working on.
2Add the video (or image), music and beat
Click ♪ Audio to add music and the beat, and ▣ Video / Image to add a video or a background image. You can also drag and drop files straight into the app window. The first audio file becomes the main music (marked with a ★ on the timeline) used for marking the lyrics. To change it, right-click a clip on the timeline and choose Use as main music.
Each file sits on its own track on the timeline at the bottom of the screen. In the sample project below you can see three tracks: Video 1 (the video with the original vocals), Aa Lyrics (the blocks of marked words) and Audio 1 (the beat).
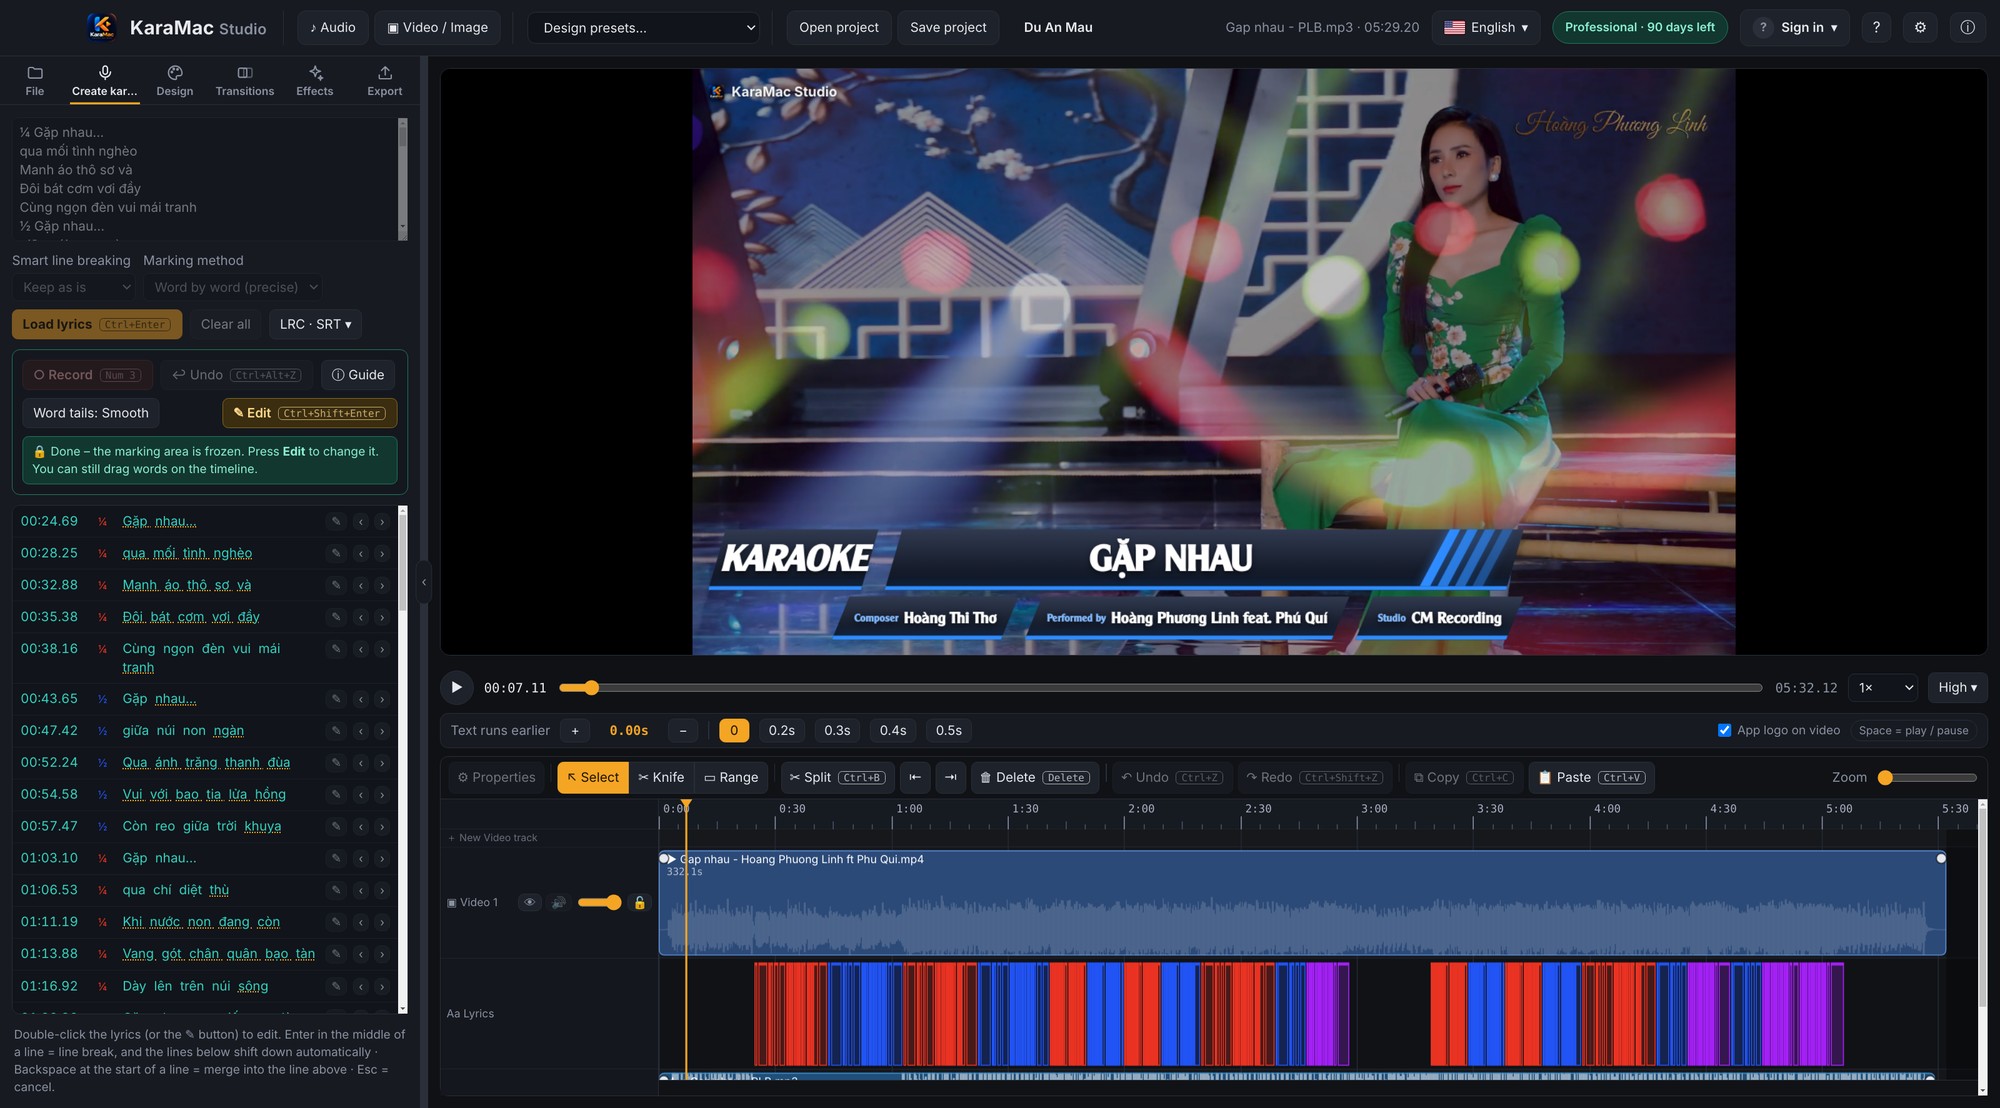
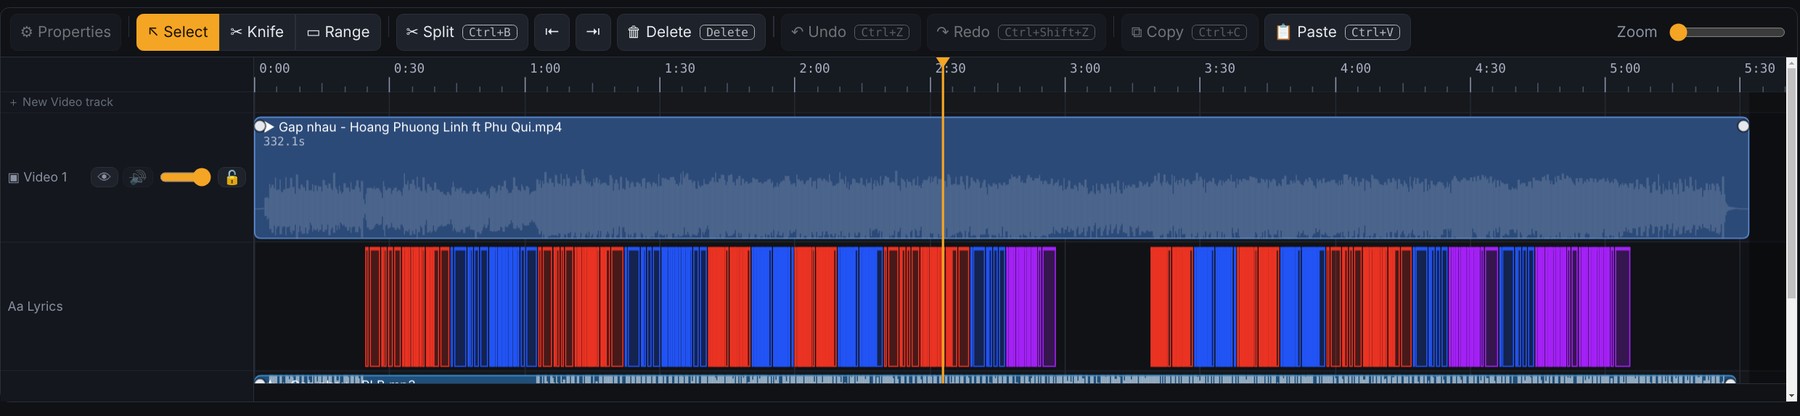
The small buttons at the start of each track are 🔊 mute / unmute, 👁 show / hide the picture, 🔒 lock the track so you don’t drag things by accident, and a slider for that track’s volume.
💡 Fit all tracks to the window: when a project has many tracks, the timeline can get cramped or the tracks end up with uneven heights. Press Ctrl+Option+⌘+↑ (Mac) or Win+Ctrl+Alt+↑ (Windows) and the app divides the height evenly between all video and audio tracks so they fit the timeline (each track keeps a minimum height so it stays readable). To adjust a single track, hover over the bottom edge of its header (the left column with the buttons) and drag up or down. Double-click that edge to reset the track to its default height.
3Sync the beat with the version that has vocals
The beat and the version with vocals are usually a few seconds apart, because each one starts with a different amount of silence. Kara Studio aligns them automatically by comparing the audio waveforms:
- Select both clips on the timeline (hold Ctrl on Windows or ⌘ on Mac, or Shift, and click each clip).
- Right-click and choose Sync audio (or press Ctrl+Shift+Y on Windows, ⌘+Option+Y on Mac).
- Press play and listen: the beat and the version with vocals should be in time.
If the app says it can’t find matching sections, drag the beat clip left or right by hand until it lines up, then nudge it with Alt (Windows) or Option (Mac) plus the arrow keys.
4Paste the lyrics and click Load lyrics
In the Create karaoke tab, paste the lyrics into the lyrics box at the top left, one line per phrase. Then click Load lyrics (shortcut Ctrl+Enter or ⌘+Enter). This step splits the lyrics into individual words for you to mark. Until you paste lyrics and click Load lyrics, there are no words to mark.
Already marked the song but need to add or edit lyrics? Edit them in the lyrics box and click Load lyrics again. Unchanged lines and words keep their timing; only newly added lines (orange edge in the lyrics list) need to be recorded, so you never start over.
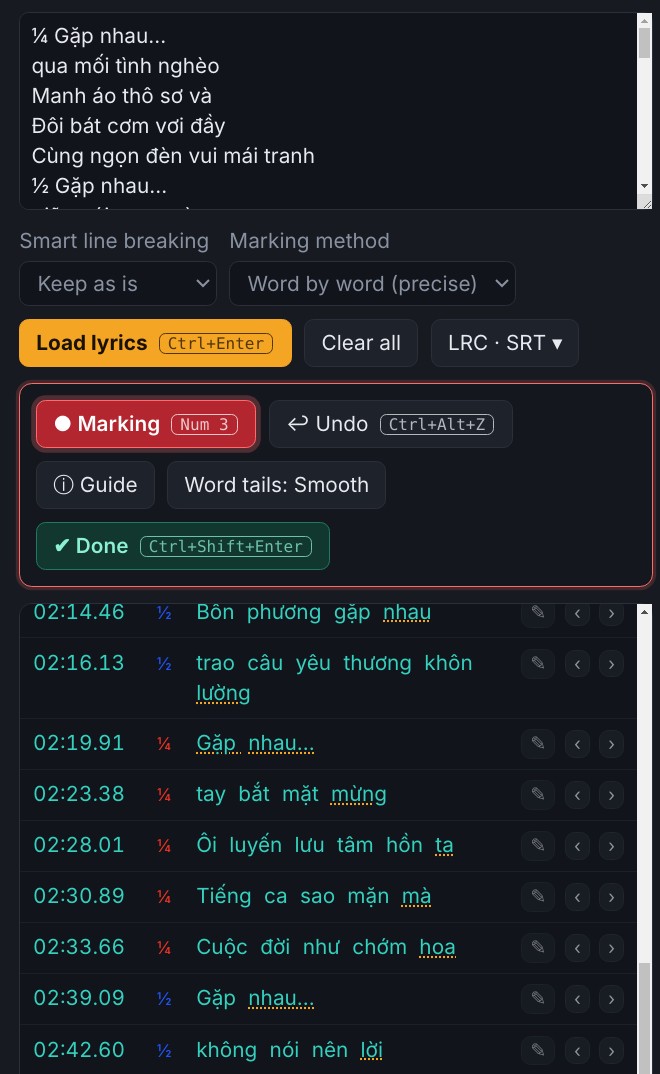
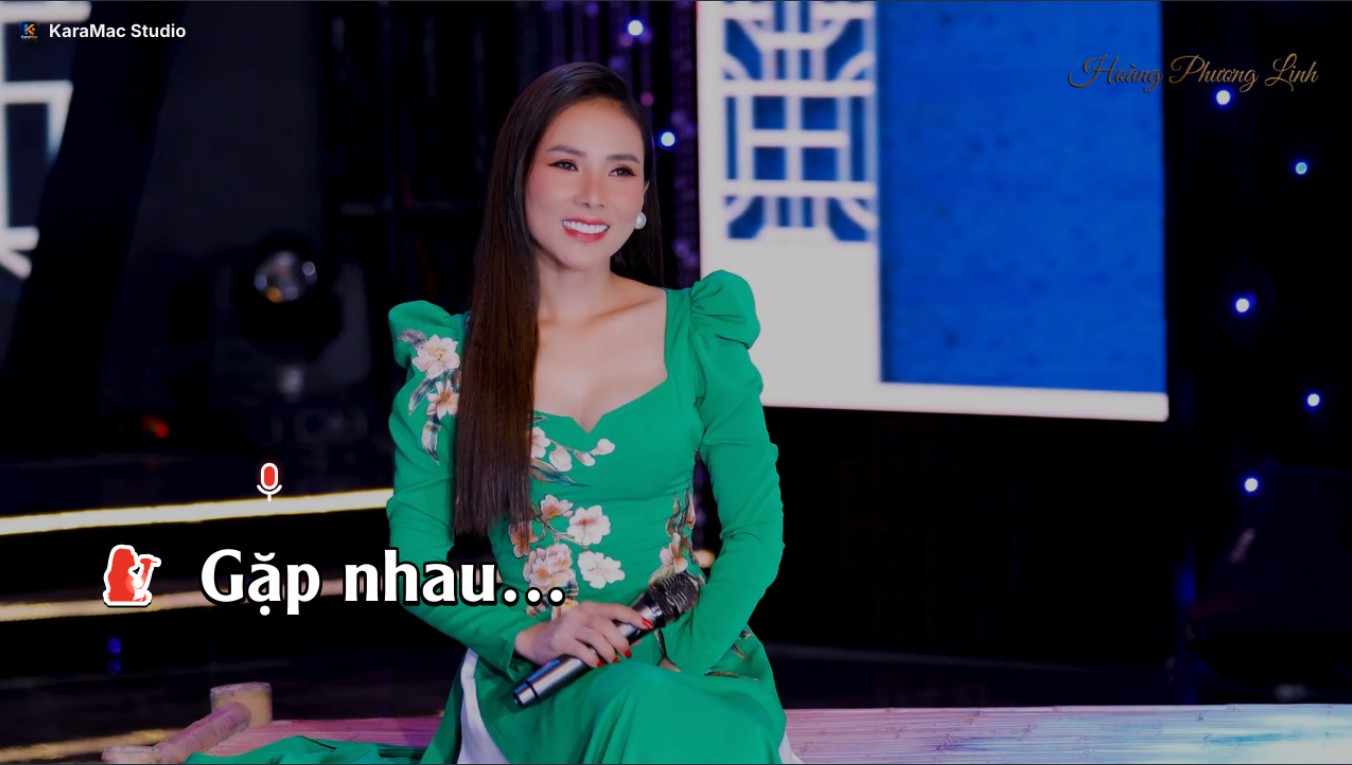
In the list of lines, each line starts with a singer marker: ½ in blue is a male voice, ¼ in red is a female voice and ¾ in purple is a duet. Click the marker to change the voice, and the words will use the matching color when sung. These markers come from the UTM Alexander Icon Pro font, the default font of Kara Studio.
5Mark the timing of every word (Record)
This is the step that decides whether the lyrics follow the song in time:
- Click the Record button (or press 3 on the numeric keypad) to start marking.
- Listen to the music. Each press of Space marks one word, pressed exactly when that word starts being sung.
- For a long, held word, hold Space until the word ends, then release.
- When the lyrics run out, Record switches off by itself and Space goes back to play / pause.
If you press at the wrong time, click Undo next to Record, or press Ctrl+Shift+U on Windows or ⌘+Option+Z on Mac, to step back one word and mark it again. For difficult passages you can lower the playback speed to mark more slowly and precisely.
6Click Done and fine-tune on the timeline
When you finish marking, click ✔ Done to lock this part so you don’t press anything by accident. To change it later, click Edit. You can still drag individual words on the Aa Lyrics track to line them up.
- A word slightly off: select it and move it with Alt/Option + left / right arrow (0.05 second per press), add Shift for 0.5 second.
- To cut a clip: choose the Knife tool (or press B) and click where you want to cut. Q / W cut away the part before / after the playhead.
- Repeated choruses or lines: drag to select the section you already marked and copy it to where it repeats, no need to mark it again.
7Design the lyrics, title and background
Open the Design tab. Here you choose the font, size, the color of unsung and sung words, outline, the line cue effect, the video title, countdown and logo. The preview shows exactly what the exported video will look like, and you can drag the title, logo and lyrics lines right on it to move them. When you like a design, click Save style to reuse it on other songs.
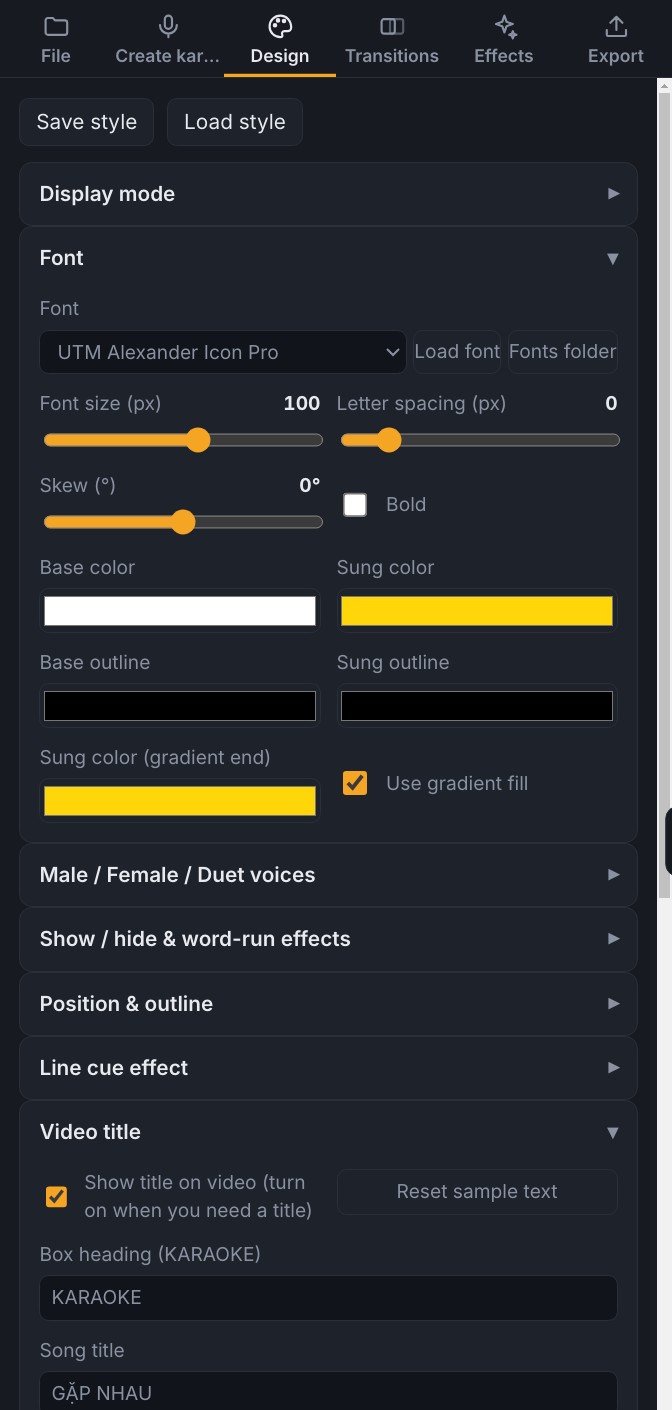
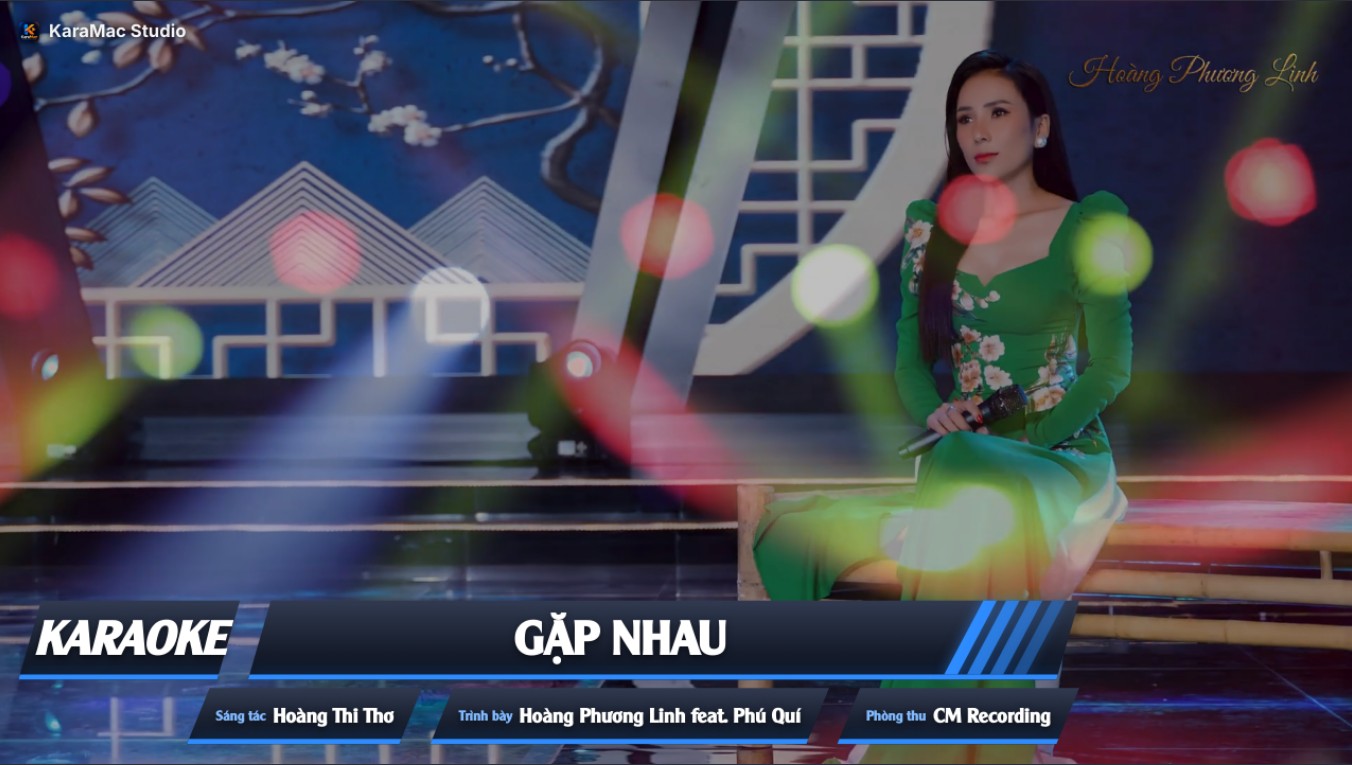
Many videos already have a title, so Kara Studio does not add one by itself. When you need one, open the Video title section, switch on Show title on video and fill in the song title and details such as composer, performer and studio. By default the title appears from second 0.5 and stays for 7 seconds. You can also double-click the title on the preview to select the whole box (drag to move, drag a corner to resize), then double-click any text in it to edit that text directly. Replace all the sample text with your own information before exporting.
8Transitions and effects (when you use several images or videos)
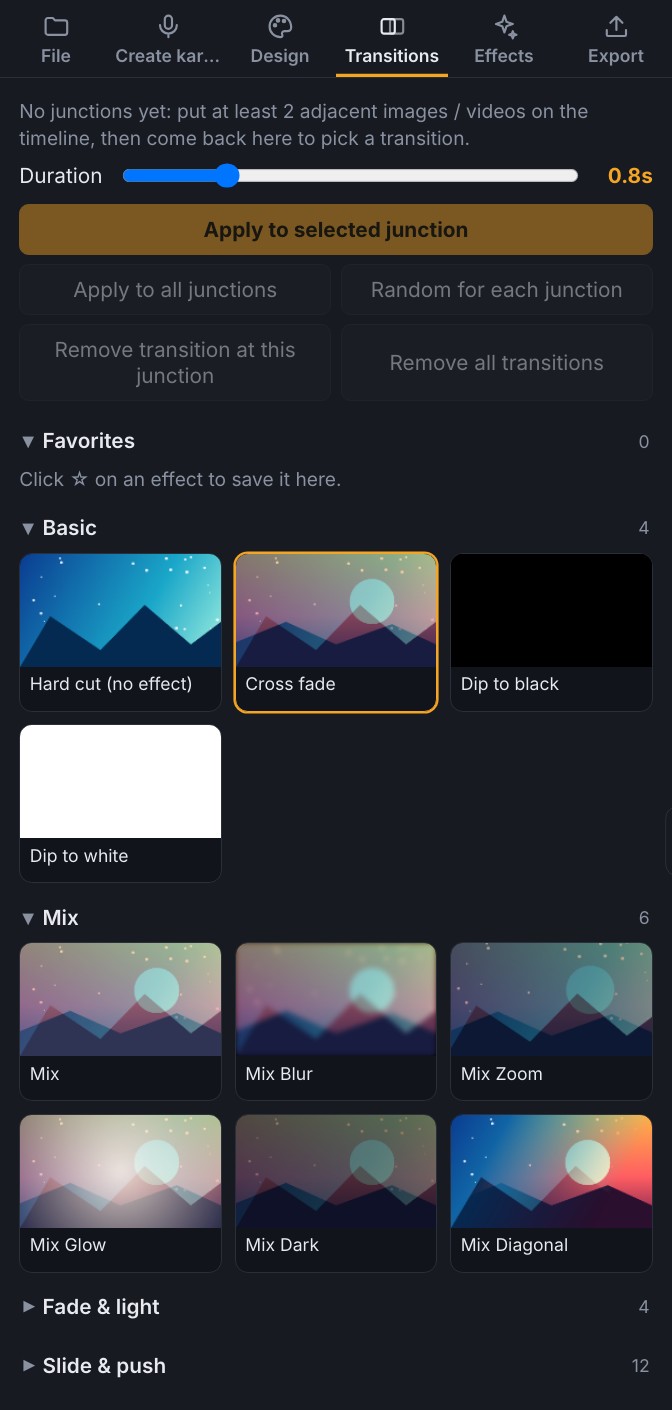
If the background is made of several images or video clips in a row, the Transitions tab makes the joins smoother: click an effect to preview it, drag it onto the junction between two clips, or apply it to all junctions. A transition needs at least two adjacent images or videos on the timeline.
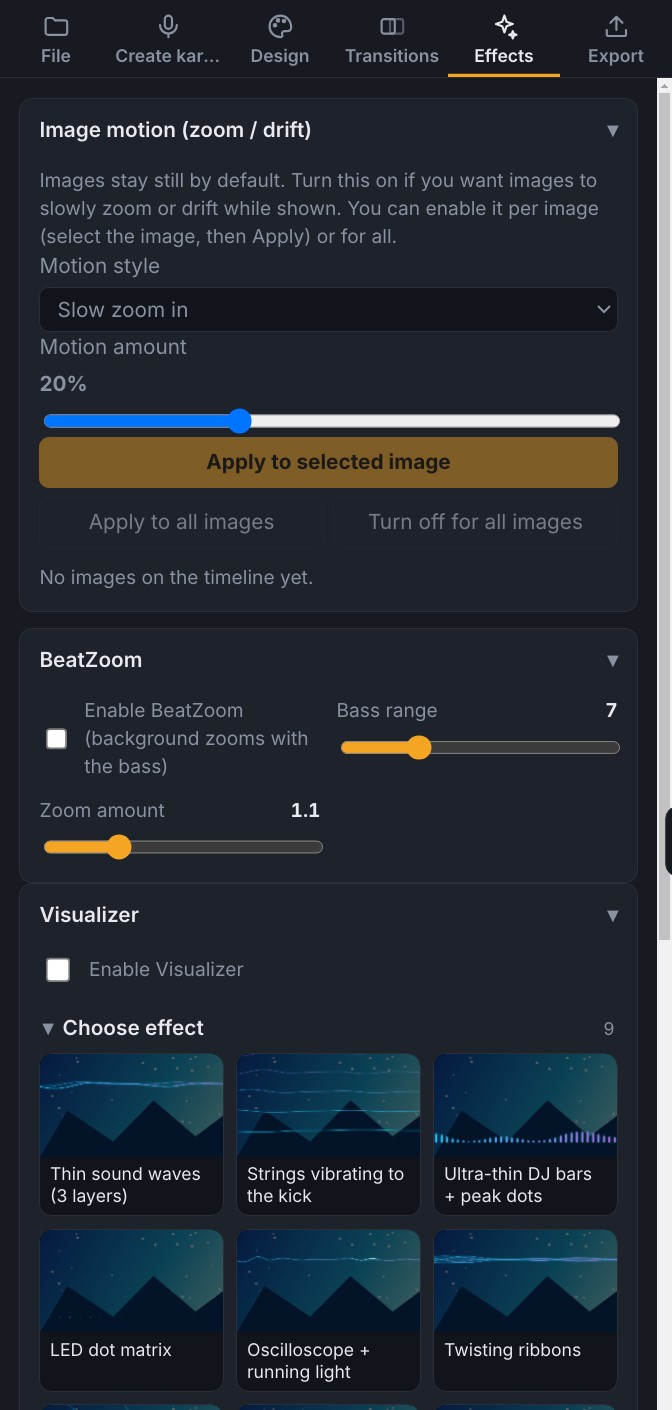
The Effects tab offers image motion (slow zoom or drift, since images stay still by default), BeatZoom (the background zooms with the bass) and a Visualizer (sound waves) with many ready-made styles.
9Final check and export the video
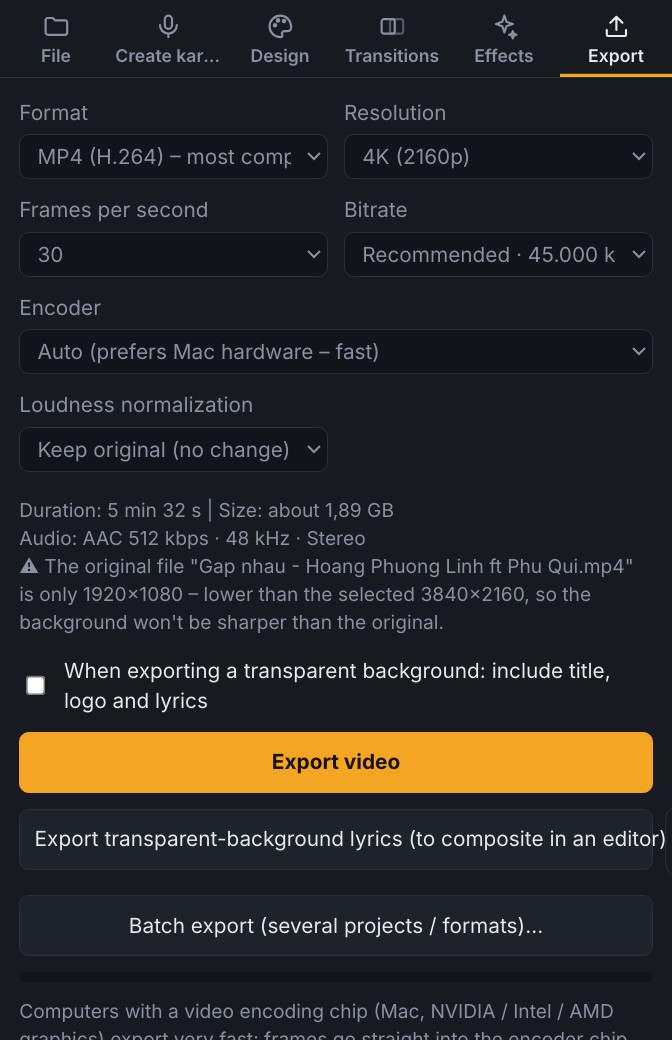
Before exporting, check again: mute the version with vocals and any video with the original singer’s voice (the 🔊 button at the start of the track) so only the beat remains. Then open the Export tab, choose the format (MP4 H.264 is the most widely compatible), resolution and frames per second, and click Export video (shortcut Ctrl+E or ⌘+E). To process several songs at once, use Batch export.

Don’t forget to save the project with Ctrl+S (Windows) or ⌘+S (Mac). A project includes the lyrics, every word’s timing, the design and all tracks. To move it to another computer, choose Save a copy with all media.
Handy shortcuts
| Action | Windows | Mac |
|---|---|---|
| Load lyrics | Ctrl+Enter | ⌘+Enter |
| Record on / off | 3 (numeric keypad) | 3 (numeric keypad) |
| Play / pause | Space | Space |
| Undo one marked word | Ctrl+Shift+U | ⌘+Option+Z |
| Sync audio | Ctrl+Shift+Y | ⌘+Option+Y |
| Split at playhead (selected clips; none selected splits all clips) | Ctrl+B | ⌘+B |
| Fit all tracks to window | Win+Ctrl+Alt+↑ | Ctrl+Option+⌘+↑ |
| Save project | Ctrl+S | ⌘+S |
| Export video | Ctrl+E | ⌘+E |
| Full-screen preview | ⛶ button · Esc to exit | ⛶ button · Esc to exit |
| Replay the in-app tour | F1 | F1 |
The B (knife), Q / W (cut away before / after the playhead) and M (add a marker at the playhead) keys only work after you click inside the track area.
Common problems
Frequently asked questions
Which computers does Kara Studio run on?
There is a Windows version and a Mac version (Apple silicon and Intel). Each account can be used on up to 2 devices.
Is there a free trial?
Yes, the app includes a 10-day trial. The product page also lists the promo codes KARA6, KARA3 and KARA1 (limited quantity).
What if I don’t have a beat?
You need an instrumental of the song. If you don’t have one, look for the instrumental version or contact CM Recording for help with music arrangement.
Can I finish on Mac and open the project on Windows?
Yes, if you choose Save a copy with all media so the music and video travel with it. Windows and Mac share the same .kara project format, so a project opens directly on either computer (older .karawin / .karamac files open too).
Download Kara Studio
See the details, pricing and download buttons for Windows and Mac on the Kara Studio page. For recording, arrangement, mixing and mastering of your own songs, contact CM Recording.